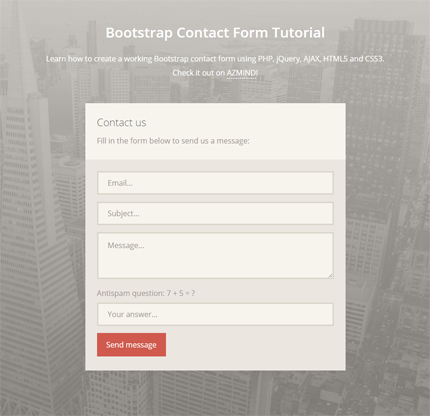
Today’s article is a tutorial where we’ll learn how to create a Bootstrap contact form using PHP, jQuery and AJAX (and also HTML5 & CSS3). If you have already seen my templates, free or premium, you know that I use these contact forms in almost everyone of them. They are very useful to have in your site as they give the user the possibility to contact you without leaving the page.
Today I’ll show you step by step how to create one and, in the end, you can download all the source files and use them in your projects. Let’s begin!
You might also like:
Bootstrap Contact Forms: 2 Free Responsive Templates
Bootstrap Contact Forms: How to Add a New Field
1. Introduction
Our contact form will have 3 input fields:
- Email: the sender’s email, so we can eventually respond to him in the future.
- Subject: the subject of the message.
- Message: the text of the message.
The form will also have an antispam question, to prevent spam messages, and another input field where the user can enter his answer.
At the end, I’ve added a fullscreen background to make it more beautiful ;).
You can see a live demo here:
2. The HTML
The HTML of our form is placed in the “index.html” file.
In the head part of our HTML we include all the needed CSS files:
- Open Sans font
- Bootstrap stylesheet
- Form elements stylesheet: where we style the input fields, text area, label and the submit button.
- General stylesheet: style.css, where we style the other elements of the page like text, titles, margins, paddings.
In the head part I’ve also added the HTML5 Shim + Respond.js (Internet Explorer 8 support for HTML5 elements and media queries) and the favicon and apple touch icons. Here is the code:
<!DOCTYPE html>
<html lang="en">

    <head>

        <meta charset="utf-8">
        <meta http-equiv="X-UA-Compatible" content="IE=edge">
        <meta name="viewport" content="width=device-width, initial-scale=1">
        <title>Bootstrap Contact Form Tutorial</title>

        <!-- CSS -->
        <link rel="stylesheet" href="https://fonts.googleapis.com/css?family=Open+Sans:400,300,600">
        <link rel="stylesheet" href="assets/bootstrap/css/bootstrap.min.css">
		<link rel="stylesheet" href="assets/css/form-elements.css">
        <link rel="stylesheet" href="assets/css/style.css">

        <!-- HTML5 Shim and Respond.js IE8 support of HTML5 elements and media queries -->
        <!-- WARNING: Respond.js doesn't work if you view the page via file:// -->
        <!--[if lt IE 9]>
            <script src="https://oss.maxcdn.com/libs/html5shiv/3.7.0/html5shiv.js"></script>
            <script src="https://oss.maxcdn.com/libs/respond.js/1.4.2/respond.min.js"></script>
        <![endif]-->

        <!-- Favicon and touch icons -->
        <link rel="shortcut icon" href="assets/ico/favicon.png">
        <link rel="apple-touch-icon-precomposed" sizes="144x144" href="assets/ico/apple-touch-icon-144-precomposed.png">
        <link rel="apple-touch-icon-precomposed" sizes="114x114" href="assets/ico/apple-touch-icon-114-precomposed.png">
        <link rel="apple-touch-icon-precomposed" sizes="72x72" href="assets/ico/apple-touch-icon-72-precomposed.png">
        <link rel="apple-touch-icon-precomposed" href="assets/ico/apple-touch-icon-57-precomposed.png">

    </head>
Next we have the main HTML code of our page, including the form and the other elements like titles, text, etc.
<body>

	<!-- Top content -->
        <div class="top-content">

            <div class="inner-bg">
                <div class="container">
                    <div class="row">
                        <div class="col-sm-8 col-sm-offset-2 text">
                            <h1>Bootstrap Contact Form Tutorial</h1>
                            <div class="description">
                            	<p>
	                            	Learn how to create a working Bootstrap contact form using PHP, jQuery, AJAX, HTML5 and CSS3.
	                            	Check it out on <a href="https://azmind.com">AZMIND</a>!
                            	</p>
                            </div>
                        </div>
                    </div>
                    <div class="row">
                        <div class="col-sm-6 col-sm-offset-3 form-box">
                            <div class="form-top">
                                <h3>Contact us</h3>
                                <p>Fill in the form below to send us a message:</p>
                            </div>
                            <div class="form-bottom contact-form">
                                <form role="form" action="assets/contact.php" method="post">
                                    <div class="form-group">
                                        <label class="sr-only" for="contact-email">Email</label>
                                        <input type="text" name="email" placeholder="Email..." class="contact-email form-control" id="contact-email">
                                    </div>
                                    <div class="form-group">
                                        <label class="sr-only" for="contact-subject">Subject</label>
                                        <input type="text" name="subject" placeholder="Subject..." class="contact-subject form-control" id="contact-subject">
                                    </div>
                                    <div class="form-group">
                                        <label class="sr-only" for="contact-message">Message</label>
                                        <textarea name="message" placeholder="Message..." class="contact-message form-control" id="contact-message"></textarea>
                                    </div>
                                    <div class="form-group">
                                        <label for="contact-antispam">Antispam question: 7 + 5 = ?</label>
                                        <input type="text" name="antispam" placeholder="Your answer..." class="contact-antispam form-control" id="contact-antispam">
                                    </div>
                                    <button type="submit" class="btn">Send message</button>
                                </form>
                            </div>
                        </div>
                    </div>
                </div>
            </div>

        </div>
Since the part that interests us most is the contact form, here is only the HTML code of the form for a quick reference:
<form role="form" action="assets/contact.php" method="post">
    <div class="form-group">
        <label class="sr-only" for="contact-email">Email</label>
        <input type="text" name="email" placeholder="Email..." class="contact-email form-control" id="contact-email">
    </div>
    <div class="form-group">
        <label class="sr-only" for="contact-subject">Subject</label>
        <input type="text" name="subject" placeholder="Subject..." class="contact-subject form-control" id="contact-subject">
    </div>
    <div class="form-group">
        <label class="sr-only" for="contact-message">Message</label>
        <textarea name="message" placeholder="Message..." class="contact-message form-control" id="contact-message"></textarea>
    </div>
    <div class="form-group">
        <label for="contact-antispam">Antispam question: 7 + 5 = ?</label>
        <input type="text" name="antispam" placeholder="Your answer..." class="contact-antispam form-control" id="contact-antispam">
    </div>
    <button type="submit" class="btn">Send message</button>
</form>
To end this paragraph, here is the last part of our HTML. Here we have included all the Javascript files:
- jQuery
- Bootstrap JS: we don’t need it here, you can remove it; or you can keep it if your project needs it.
- Backstretch JS: for the fullscreen background.
- scripts.js: where we initialize the fullscreen background and make the AJAX call when the user clicks the submit button.
- placeholder.js: this is for Internet Explorer 9 and below because they don’t support the “placeholder” attribute in input fields. We use conditional comments here.
Below you can see the code:
        <!-- Javascript -->
        <script src="assets/js/jquery-1.11.1.min.js"></script>
        <script src="assets/bootstrap/js/bootstrap.min.js"></script>
        <script src="assets/js/jquery.backstretch.min.js"></script>
        <script src="assets/js/scripts.js"></script>

        <!--[if lt IE 10]>
            <script src="assets/js/placeholder.js"></script>
        <![endif]-->

    </body>

</html>
3. The CSS
As we said above, our CSS code is placed in two files: “form-elements.css”, where we style the input fields, text area, label and the submit button; “style.css”, where we style the other elements of the page like text, titles, margins, paddings.
In “style.css” we’ve put also some media queries.
Here is the CSS code of “form-elements.css”:
input[type="text"],
textarea,
textarea.form-control {
    height: 50px;
    margin: 0;
    padding: 0 20px;
    vertical-align: middle;
    background: #f7f4ed;
    border: 3px solid #d9d7cb;
    font-family: 'Open Sans', sans-serif;
    font-size: 16px;
    font-weight: 400;
    line-height: 50px;
    color: #9d9892;
    -moz-border-radius: 0; -webkit-border-radius: 0; border-radius: 0;
    -moz-box-shadow: none; -webkit-box-shadow: none; box-shadow: none;
    -o-transition: all .3s; -moz-transition: all .3s; -webkit-transition: all .3s; -ms-transition: all .3s; transition: all .3s;
}

textarea,
textarea.form-control {
    padding-top: 10px;
    padding-bottom: 10px;
    line-height: 30px;
}

input[type="text"]:focus,
textarea:focus,
textarea.form-control:focus {
    outline: 0;
    background: #f7f4ed;
    border: 3px solid #c4c0b4;
    -moz-box-shadow: none; -webkit-box-shadow: none; box-shadow: none;
}

input[type="text"]:-moz-placeholder, textarea:-moz-placeholder, textarea.form-control:-moz-placeholder { color: #9d9892; }
input[type="text"]:-ms-input-placeholder, textarea:-ms-input-placeholder, textarea.form-control:-ms-input-placeholder { color: #9d9892; }
input[type="text"]::-webkit-input-placeholder, textarea::-webkit-input-placeholder, textarea.form-control::-webkit-input-placeholder { color: #9d9892; }

label {
    font-weight: 400;
}

button.btn {
    height: 50px;
    margin: 0;
    padding: 0 20px;
    vertical-align: middle;
    background: #d05a4e;
    border: 0;
    font-family: 'Open Sans', sans-serif;
    font-size: 16px;
    font-weight: 400;
    line-height: 50px;
    color: #fff;
    -moz-border-radius: 0; -webkit-border-radius: 0; border-radius: 0;
    text-shadow: none;
    -moz-box-shadow: none; -webkit-box-shadow: none; box-shadow: none;
    -o-transition: all .3s; -moz-transition: all .3s; -webkit-transition: all .3s; -ms-transition: all .3s; transition: all .3s;
}

button.btn:hover { opacity: 0.6; color: #fff; }

button.btn:active { outline: 0; opacity: 0.6; color: #fff; -moz-box-shadow: none; -webkit-box-shadow: none; box-shadow: none; }

button.btn:focus { outline: 0; opacity: 0.6; background: #d05a4e; color: #fff; }

button.btn:active:focus, button.btn.active:focus { outline: 0; opacity: 0.6; background: #d05a4e; color: #fff; }
And here is the CSS code of “style.css”:
body {
    background: #d9d7cb;
    font-family: 'Open Sans', sans-serif;
    font-size: 16px;
    font-weight: 400;
    color: #9d9892;
    line-height: 30px;
    text-align: center;
}

strong { font-weight: 600; }

a, a:hover, a:focus {
    color: #d05a4e;
    text-decoration: none;
    -o-transition: all .3s; -moz-transition: all .3s; -webkit-transition: all .3s; -ms-transition: all .3s; transition: all .3s;
}

h1, h2 {
    margin-top: 10px;
    font-size: 30px;
    font-weight: 600;
    color: #615c58;
    line-height: 42px;
}

h3 {
    font-size: 22px;
    font-weight: 300;
    color: #615c58;
    line-height: 30px;
}

img { max-width: 100%; }

::-moz-selection { background: #d05a4e; color: #fff; text-shadow: none; }
::selection { background: #d05a4e; color: #fff; text-shadow: none; }


/***** Top content *****/

.inner-bg {
    padding: 40px 0 170px 0;
}

.top-content h1 { color: #fff; }

.top-content .description {
    margin: 20px 0 10px 0;
    color: #fff;
}

.top-content .description a { color: #fff; border-bottom: 2px dotted #fff; }
.top-content .description a:hover,
.top-content .description a:focus { border: 0; }

.top-content .top-big-link {
    margin-top: 35px;
}

.form-box {
    padding-top: 40px;
}

.form-top {
    padding: 25px 25px 15px 25px;
    background: #f7f4ed;
    text-align: left;
}

.form-top h3 { margin-top: 0; }

.form-bottom {
    padding: 25px 25px 30px 25px;
    background: #ebe6e0;
    text-align: left;
}

.form-bottom form textarea {
    height: 100px;
}

.form-bottom form .input-error {
    border-color: #d05a4e;
}


/***** Media queries *****/

@media (min-width: 992px) and (max-width: 1199px) {}

@media (min-width: 768px) and (max-width: 991px) {}

@media (max-width: 767px) {

    .inner-bg { padding: 40px 0 110px 0; }

}
4. The PHP
We use some PHP code to validate the form’s fields (from the server) and send the email. The PHP code is in the “contact.php” file (we make an AJAX call to this file using jQuery, we’ll see it below).
Here is the “contact.php” code:
<?php

// Email address verification
function isEmail($email) {
    return filter_var($email, FILTER_VALIDATE_EMAIL);
}

if($_POST) {

    // Enter the email where you want to receive the message
    $emailTo = 'contact.azmind@gmail.com';

    $clientEmail = addslashes(trim($_POST['email']));
    $subject = addslashes(trim($_POST['subject']));
    $message = addslashes(trim($_POST['message']));
    $antispam = addslashes(trim($_POST['antispam']));

    $array = array('emailMessage' => '', 'subjectMessage' => '', 'messageMessage' => '', 'antispamMessage' => '');

    if(!isEmail($clientEmail)) {
        $array['emailMessage'] = 'Invalid email!';
    }
    if($subject == '') {
        $array['subjectMessage'] = 'Empty subject!';
    }
    if($message == '') {
        $array['messageMessage'] = 'Empty message!';
    }
    if($antispam != '12') {
        $array['antispamMessage'] = 'Wrong antispam answer!';
    }
    if(isEmail($clientEmail) && $subject != '' && $message != '' && $antispam == '12') {
        // Send email
        $headers = "From: " . $clientEmail . " <" . $clientEmail . ">" . "\r\n" . "Reply-To: " . $clientEmail;
        mail($emailTo, $subject . " (bootstrap contact form tutorial)", $message, $headers);
    }

    echo json_encode($array);

}

?>
At the beginning we have a simple function that checks if an email address is correct. This function is used to check the email entered by the user.
Then, inside the “if($_POST) {“:
- 1) We save in a variable the email where we want to receive the message.
- 2) We create different variables for saving the values of each field of the form that we receive in POST (we receive them from the AJAX call).
- 3) We create an array to store the error messages. For example, when a field is empty, or when the antispam answer is wrong.
- 4) We check every field. If any of them is incorrect, we save the error message in the array created before.
- 5) If all the fields are correct, we send the email.
- 6) We send the array (containing the error messages) as a response to the AJAX call. The array is sent even if there are no errors. This is the case when the email is sent correctly. The error messages will be empty.
5. The Javascript (jQuery)
Our Javascript (jQuery) code is placed in the “scripts.js” file. Here we first set up the fullscreen background by entering the URL of the image we want to use.
Then we handle the contact form. Let’s see the code first so we can explain it after that:
jQuery(document).ready(function() {

    /*
        Fullscreen background
    */
    $.backstretch("assets/img/backgrounds/1.jpg");

    /*
	Contact form
    */
    $('.contact-form form input[type="text"], .contact-form form textarea').on('focus', function() {
        $('.contact-form form input[type="text"], .contact-form form textarea').removeClass('input-error');
    });
    $('.contact-form form').submit(function(e) {
        e.preventDefault();
        $('.contact-form form input[type="text"], .contact-form form textarea').removeClass('input-error');
        var postdata = $('.contact-form form').serialize();
        $.ajax({
            type: 'POST',
            url: 'assets/contact.php',
            data: postdata,
            dataType: 'json',
            success: function(json) {
                if(json.emailMessage != '') {
                    $('.contact-form form .contact-email').addClass('input-error');
                }
                if(json.subjectMessage != '') {
                    $('.contact-form form .contact-subject').addClass('input-error');
                }
                if(json.messageMessage != '') {
                    $('.contact-form form textarea').addClass('input-error');
                }
                if(json.antispamMessage != '') {
                    $('.contact-form form .contact-antispam').addClass('input-error');
                }
                if(json.emailMessage == '' && json.subjectMessage == '' && json.messageMessage == '' && json.antispamMessage == '') {
                    $('.contact-form form').fadeOut('fast', function() {
                        $('.contact-form').append('<p>Thanks for contacting us! We will get back to you very soon.</p>');
                        // reload background
                        $.backstretch("resize");
                    });
                }
            }
        });
    });

});
When the user clicks the “Send message” button, we make an AJAX request to the “contact.php” file on the server passing all the fields’ values of the contact form (in the background, without reloading the page).
If the form validation is successful (point 4 above), we hide the form and display a “thank you” message. If not, we display an error message (in this case we add the “input-error” class to the fields which makes their borders red, [or is it orange?!]).
6. Conclusions
That’s all! We’ve just created a Bootstrap contact form using all these beautiful things like PHP, jQuery, AJAX, HTML5 and CSS3. Now download the files below and create something cool!
If you have any question or suggestion, let me know in the comments.
7. Demo, Download and License
DOWNLOAD: Bootstrap Contact Form Tutorial (15367 downloads )
LICENSE:
You can use this contact form in personal and commercial projects, but you can’t sell or distribute it directly, “as is”. If you plan to use it, a link to this page or any form of spreading the word will be much appreciated.
Want More?
If you need a template with different layouts, color schemes and features, along with free support and free updates, you should take a look at the Marco template:
Stay Updated
Subscribe to the Azmind Newsletter and I’ll update you as soon as I release a new WordPress Theme, Bootstrap Template, Tutorial or other Freebie:
To learn how we use your data when you sign up to our newsletter, read our Privacy Policy here.





Hi,
I don’t receive any e-mails from the form. Of course I changed the mail address in the php file. What could it be ?
Thanks
Hi Guilhem,
I don’t know. It could be Javascript errors, PHP errors, server configuration problems (the PHP “mail” function doesn’t work on your server), etc.
nope I tested the mail function of my server with a basic mail() function. Everything is ok on the server side. You’ve got several messages above that reports the problem of “everything is ok but I do not receive any mail”. You should look into this as it seems to be a frequent problem.
Sincerely,
I don’t think I should look into this because in the demo on my server it works perfectly. So, I don’t know where to look.
The only solution would be to check the sites of all the users of this form, one by one, which is not possible for me.
As for your problem, now that you are sure the “mail” function works, you might still have: Javascript errors, PHP errors, a server that doesn’t support AJAX.
Me too, my servers works perfectly I’ve tried with several other same contact forms but I don’t receive email with this one.
I don’t know where is the problem I don’t get any error message on user side and on error_log!
My server is apache!
Can you give me the link where you have uploaded the template?
how secure is this form? is it vulnerable to malicious attacks?
What type of attacks?
Hey im having the same issue as everyone else, all i did was change the email address in the php to my own, and uploaded it to my server for testing and it doesnt actually work and theres no errors. Any idea?
Hey, i am solving one problem, when I have contact form with two subject (mobile and email), but if I add another two subject like name and city, and send email, city and name didn’t show up in email which I sent from website where is contact form. Any idea? It’s through php funciton with jQuery, and contact form is for 10 people
Thanks
I got two messages from this contact form, when I’m using it on my website. Any idea why?
Hello! Thank you for a great tutorial. However, i’m facing an issue right now.
One one of my websites the form works perfectly. I copied the code to the other website and now i get this message and don’t receive emails 🙁
” . “\r\n” . “Reply-To: ” . $clientEmail; mail($emailTo, $phone . ” (bootstrap contact form)”, $message, $headers); } echo json_encode($array); } ?>
Any idea what it can be related to and how to fix it?
Hello, The contact form works fine, however there is one issue: None of my error messages appear if the user leaves a cell blank or does not type anything in the cell. Has anyone else had this issue and was able to resolve it?
good evening,
I need to load on a page 2 form.
To fill the fields of the form without reloading the page?
Thank you
Hi,
Many thanks for the tutorial, I am a self taught webmaster looking after a club website I built and I am wondering if you can help me refine the form a little.
Everything seems to work the way it should, but when I get the email all it has is the message text and none of the other information, ie: Name, Email, etc
I have added an extra field to the top called Hash Name and added this line of text into the php file, (I’m a complete php novice)
$name = addslashes(trim($_POST[‘subject’]));
In the html I added the following, are they both correct and is there anything else that needs to be added for that extra field to work ??
Hash Name
Lastly, I would like to get rid of your background image as it just doesn’t go with the rest of the site, just where is that located, I can’t seem to find it and view background image in Firefox is greyed out so that won’t tell me where it is.
Kindest Regards
Bam Bam
Sorry, one last thing, I would like to replace (bootstrap contact form) in the email received with (PJH3 Contact Form), where is that located as well so I can change that.
Bam Bam
Apologies again, OK I found that bit of text and changed it and I noticed an error in the php and have changed it to:
$name = addslashes(trim($_POST[‘name’]));
It doesn’t change what I get in the email though.