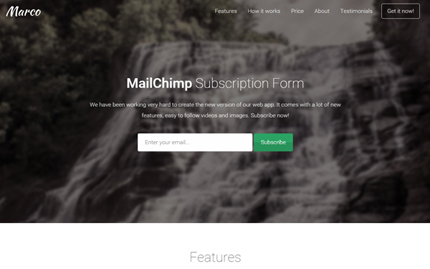
If you’re using email marketing for growing your business, you have probably heard about MailChimp. You can register to MailChimp for free and start using it. With the “Free Plan” you can have up to 2000 subscribers and send up to 12000 emails per month.
Ok, now that we know MailChimp is great for starting your email list, let’s learn how to add a MailChimp subscription form to a Bootstrap template / landing page. Today in this tutorial we’ll learn it step by step using the Marco template as an example. Though, these instructions can also be used for my other templates.
Update, 11 February 2016:
I’ve updated the tutorial and now it should work with the MailChimp API v3.0.
Attention: If you try it in your local computer (for example with XAMPP) it might give PHP warnings / errors. Please try it on a server.
The Problem
Actually, there are two problems that we’ll solve with this tutorial.
Problem 1:
Until this moment all my Bootstrap templates, free or premium, that had a subscription form, received the new subscribers by email, in a chosen email address.
They did not collect the subscribers’ emails in one place, in any sort of “storage system” like a text file, an Excel file, a database, a MailChimp list, etc.
Problem 2:
MailChimp offers a lot of ready-to-use forms but in some cases they need some additional work to make them match the design and behavior of your website, template or landing page.
At the end of this article you’ll know how to add a simple subscribe form to a Bootstrap template (Marco in this case) and integrate it with MailChimp.
The Solution
A few months ago, a user of the Jesis template asked me if I could integrate MailChimp into his page. So I made some research and, thanks to this tutorial (which I applied to my case), I managed to do it in a few minutes.
So, to solve the problems above you can:
- Follow this tutorial and learn how to do it.
- Buy the Marco template with the MailChimp form integrated for you. You just have to add your “MailChimp API Key” and “MailChimp List ID”. Note: If you have already bought the template, you should have received the update.
- Hire a developer.
Let’s begin the tutorial!
In this guide, as in my other templates, we’ll use HTML, PHP and Javascript (jQuery). The validation and all the form processing will be made with AJAX, without reloading the page.
The HTML
Here is the HTML code of the form, in the “index.html” file. As you can see it’s a simple form with a text input field and a submit button.
To see how the forms are defined and used in Bootstrap, read the documentation.
<div class="subscribe wow fadeInUp">

    <form class="form-inline" role="form" action="assets/subscribe.php" method="post">
        <div class="form-group">
            <label class="sr-only" for="subscribe-email">Email address</label>
            <input type="text" name="email" placeholder="Enter your email..." class="subscribe-email form-control" id="subscribe-email">
        </div>
        <button type="submit" class="btn">Subscribe</button>
    </form>

    <div class="success-message"></div>
    <div class="error-message"></div>
</div>
The PHP
For this tutorial (and in the Marco template) I’ve used the MailChimp API v3.0. For the PHP code that will process the form data (in the “subscribe.php” file), we’ll need:
- A simple, minimum abstraction MailChimp API v3.0 wrapper, in PHP, by Drew McLellan. You can check it out and download here. In simple words: it’s a PHP class called “MailChimp.php” that we’ll include and use in “subscribe.php”.
- The MailChimp API Key. You can learn how to find it here.
- The MailChimp List ID, where we’ll save the new subscribers. You can learn how to find it here.
After downloading the “MailChimp.php” class we’ll put it in the same folder as “subscribe.php”, in “/assets”. Here is the PHP code for processing the form (“subscribe.php” file):
<?php

require_once 'MailChimp.php';
use \DrewM\MailChimp\MailChimp;

// Email address verification
function isEmail($email) {
    return filter_var($email, FILTER_VALIDATE_EMAIL);
}

if($_POST) {

    $mailchimp_api_key = 'YOUR-API-KEY'; // enter your MailChimp API Key
    // ****
    $mailchimp_list_id = 'YOUR-LIST-ID'; // enter your MailChimp List ID
    // ****

    $subscriber_email = addslashes( trim( $_POST['email'] ) );

    if( !isEmail($subscriber_email) ) {
        $array = array();
        $array['valid'] = 0;
        $array['message'] = 'Insert a valid email address!';
        echo json_encode($array);
    }
    else {
        $array = array();

        $MailChimp = new MailChimp($mailchimp_api_key);

        $result = $MailChimp->post("lists/$mailchimp_list_id/members", [
        		'email_address' => $subscriber_email,
        		'status'        => 'pending',
        ]);

        if($result == false) {
            $array['valid'] = 0;
            $array['message'] = 'An error occurred! Please try again later.';
        }
        else {
            $array['valid'] = 1;
            $array['message'] = 'Thanks for your subscription! We sent you a confirmation email.';
        }

            echo json_encode($array);

    }

}

?>
In the beginning of the file we include (require) the “MailChimp.php” class. Then we validate the email address with the “isEmail” function. If it’s valid, we call the MailChimp class to add the new subscriber to the list.
In the MailChimp call we pass the “list id”, the subscriber’s email and the subscriber status. In this case we have a pending status, so a confirmation email is sent to the subscriber.
If we wanted to add the subscriber to our list directly, without sending a confirmation email, the status would be “subscribed”.
You can learn more about the MailChimp API in the links above.
After the call, we check if the result is successful or not and return a message. You can modify these messages as you like, of course.
The Javascript (jQuery)
Here is the Javascript (jQuery) code where we make the AJAX call (to “subscribe.php”) and display the error and success messages (along with some CSS3 animations). File “scripts.js” (/assets/js):
$('.subscribe form').submit(function(e) {
    e.preventDefault();
    var postdata = $('.subscribe form').serialize();
    $.ajax({
        type: 'POST',
        url: 'assets/subscribe.php',
        data: postdata,
        dataType: 'json',
        success: function(json) {
            if(json.valid == 0) {
                $('.success-message').hide();
                $('.error-message').hide();
                $('.error-message').html(json.message);
                $('.error-message').fadeIn('fast', function(){
                    $('.subscribe form').addClass('animated shake').one('webkitAnimationEnd mozAnimationEnd MSAnimationEnd oanimationend animationend', function(){
                        $(this).removeClass('animated shake');
                    });
                });
            }
            else {
                $('.error-message').hide();
                $('.success-message').hide();
                $('.subscribe form').hide();
                $('.success-message').html(json.message);
                $('.success-message').fadeIn('fast', function(){
                    $('.top-content').backstretch("resize");
                });
            }
        }
    });
});
Conclusion
With this simple tutorial we learned how to add a MailChimp subscription form to a Bootstrap template (or how to modify a subscribe form and connect it with MailChimp).
This way we have all our subscribers in one place and we can use a powerful tool like MailChimp to send them emails, edit or delete them, etc.
In this tutorial I’ve used my template Marco as an example, but you can also apply the instructions to other templates (mine or not) with little modifications.
Now here are some links to see a live demo or to learn more about Marco. For the preview choose the “Layout 14”.
If you have any question or suggestion, please let me know in the form below.
All the best,
Anli
Stay Updated
Subscribe to the Azmind Newsletter and I’ll update you as soon as I release a new WordPress Theme, Bootstrap Template, Tutorial or other Freebie:
To learn how we use your data when you sign up to our newsletter, read our Privacy Policy here.

Will you mind sharing your css code to make the “animated shake” classes work?
Thanks for the tutorial.
Hi Anli –
I am getting the following error:
Parse error: syntax error, unexpected subscribe.php on line 31
Any thoughts much appreciated
Thanks !
Hey there!
I’ve done this tut step by step but i get a 500 error in chrome when I’m trying to subscribe. Dunno why :/
Someone maybe an idea?
Greetings 🙂
Hi,
Great tutorial. working perfect other than the success message like your demo.
I am brought to a white screen with the valid 1: success message on it.
I have double checked the script.js file is in right folder and has correct code you added.
Any chance you can advise whats wrong.
AHA!
I tore my hear out for an hour trying to sort this and codekit helped me out.
I had the same issue as Amanda and I changed:
if(json.valid == 0) {
to
if(json.valid === 0) {
in scripts.js and it worked. God knows why as I am terrible with JS but who cares.
Thanks alot.
Unfortunately, this did not fix the error for me. Anyone else still having this problem?
I am also getting a white screen with the valid 1: success message.
I tried Burble’s solution but it didn’t work. Any others who might know?
Deanna –
Might be self evident to others, but I was finally able to figure it out by adding the following to the head of my index.html file:
Sorry, I can’t see your advice..
Guys, please don’t send your code in the comments as it doesn’t show properly. You can exchange emails if you want, and send the solution that works for you by email. 😉
For the white screen, probably you have Javascript errors. With a Google search, you can learn how to see these errors in your browser (if you don’t know how).
Dear John,
I have the same problem as Deanna. Is there maybe a chance that you send me your advice (code)?
Anli – Any ideas on why some of us are getting the whitescreen message as opposed to animation? Tried Burble’s solution and it didn’t work.
Hey John, Hey Anil,
I also get the white screen with the valid 1: success message. I can’t find an appropriate error in the error consoel. Is there any solution? pls mail me bgk.dennis@gmail.com
I’m attempting to use your code for single opt-in but on submit I want users to to be redirected to another URL. How do I make that happen? Is there something added to the array on success? What would the code look like?
Hello, if want to add something like email and full name do I have to add that into the PHP file.
Hi, I also get the result going to a white screen. Did anyone get this working? If so how?
I see John suggested adding something to the HTML file, but the post stripped out the answer… 🙁
I have also tried Burble’s solution and it did not work for me 🙁
Thanks.
My post got deleted it seems.
For the white screen issue..just include the script.js file into your index.html
I get the same white screen / valid 1: success message too
None of the .php files or index file even reference the .js file, so I’m guessing it’s just not being called ever and as such can’t do its job as a success loop – though where to put it back in order to make it work is above my knowledge (I’m not even a web designer)
Any help? Thanks,
You can open the live preview of the Marco template (link above), inpect its code in your browser (google how to do it, if you don’t know) and see where/how I’ve included the scripts.js file.
Everything is fine. Did everything according to instructions – works! When you click to subscribe it sends to a separate page ~assets/subscribe.php and written on a white background – {“valid”:1,”message”:”Thanks for your subscription! We sent you a confirmation email.”}
how to do to stay on the page?
To stay on the page you make an AJAX call to the subscribe.php file, in the background, without reloading the page.
This is done with the JavaScript code that I’ve provided above.
Thank you for this.
I was wondering if it is possible to add additional fields such as name and last or at least full name?
THANK YOU! works perfect I thought I was crazy thinking this had to be simpler….. it should be!
Hi! I know this article is old, but I’ve tried to used it. The code seems to work good but the subscription never gets. I’ll explain that, the subscription form is working, the php message is shown (thanks for your subscription…) but in the mailchimp list that subscriber never appears.